The dream of many about economical lighting was fulfilled with the advent of LED lamps . If you are fond of decorative lighting, you probably heard about the LED ribbon - an unusual luminaire in the form of a flexible tape with a length of at least 5 m, inside which there are hundreds of small lamps of one or different colors (RBG-tape), so little electricity is required for work.
Now with the help of LED strip with excellent flexible properties you can create any shape. That is why it is so widely used as a design lighting element for advertising purposes and in the entertainment industry as luminous signs. But at home people use it for decorating yards and dwellings for holidays, in particular, for the New Year . Now a large number of ready-made garlands of different configuration and length are sold in stores. But such products, as a rule, are expensive. It is much cheaper to learn how to properly connect an LED strip, and try to do it yourself.
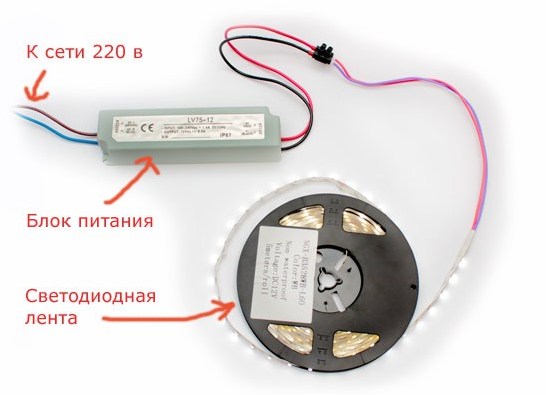
How to connect the LED strip to the network?
The most important thing that every consumer should know is that in no case can this type of lamp be directly connected to the outlet. It takes a power supply unit that is able to convert the voltage to suitable low values - 12-24 volts, and alternating current - in a constant.
So, let's see how to connect the LED strip through the power supply. In addition to the coil with LED tape and the block itself you will need:
- dimmer to adjust the brightness of the lighting single-color tape or RGB-controller tape for multi-color coil;
- Connector or terminal for connecting the unit wire to the coil wires.
What to do:
- Find the end of the contacts from the coil of the LEDs for connecting the wires. Usually in monochrome they are designated as "+" and "-", in multicolor as "R" "B" "G" and "+".
- Contacts from the power supply are connected to the contacts of a single-colored LED strip with the help of terminals: "+" combine "+", and "-", naturally, with "-". If you want to add a dimmer, then to the coil in the same way connect the output contacts. And then to the input contacts of the dimmer on the other hand, add the power supply.
- For a multi-colored LED strip, an RGB controller is mandatory. The contact of the coil "+" is connected to the analogous output contact of the controller, the contact "R" - with the corresponding one in the controller, etc. After that, the input contacts of the controller "+" and "-" are connected to the same ones for the power supply.
As to how to connect the LED tape 220 volts, then there is probably a direct connection to the home network, that is, without a power supply.
Why else can I connect the LED strip?
Often, owners of personal computers or laptops conduct a so-called modding, that is, some changes in the appearance of the device to improve its design or functionality. Now the trend of buying an LED tape with a USB connection for a small backlight, for example, a keyboard, is very popular, for example, if you use a computer at night, do not interfere fully with your second half.
Of course, such a device is easy to buy in the store of electrical appliances or accessories to the PC. But if you are a person who is not looking for easy ways, make this device yourself. In this case, the power supply is not needed, since the power itself will be produced through the computer connector. But you need:
- the coil itself or a section with LEDs;
- USB plug;
- limiting resistor, since the USB connector has a voltage of 5 volts.
So, let's move on to how to connect the LED ribbon via USB. To the LED contacts, first connect the output contacts of the resistor. Then to the last we solder the wires of the USB plug. And keep in mind that from the plug four conclusions go - two in the middle serve for data transfer. We do not need them. The output of the first "-" on the left is connected to the "-" terminal of the plug. The first pin on the right "+" is connected to the positive terminal of the resistor.