Pine and spruce cones are a wonderful and easily accessible material for children's creativity. Cones are well processed, stored for a long time, and crafts made of cones, leaves, acorns and other natural materials are an excellent opportunity for children and their parents to show fiction and imagination. In addition, crafts made of pine cones are very light, almost weightless.
When manufacturing hand-made articles of cones with your own hands, you need to take into account that after drying they have a property to open. To the shape of the cone has not changed and has not spoiled the craft, you must first dip it into the joiner's glue and allow to dry. In a warm glue the cones will close, and the dried glue will securely fix their shape. For these purposes, you can also use PVA glue or lacquer.
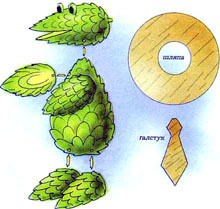
Handmade from cones "Crocodile Gena"
We need:
- cones pine - 4 pcs .;
- twigs;
- birch bark;
- scissors;
- a jigsaw;
- knife;
- glue.
Manufacturing
- We make a workpiece for the paws, for this we saw two lumps along two parts.
- For the head, take the whole bump, and make an incision along it along the length of half.
- In the largest cone - the trunk, we will make grooves with the help of an awl at the places of fastening of the head and paws.
- We will collect a hand-made article. To do this, fill the glue in the recesses and fix the head and paws with matches or toothpicks.
- We will cut out the hat and tie from the birch bark, we will make eyes from the scales of the cones.
| | |
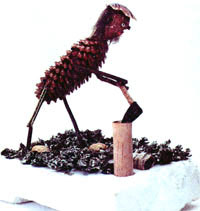
Handmade of cones "Woodcutter"
We need:
- pine cone;
- twigs;
- birch bark;
- Sunflower seeds;
- acorn;
- shell of pistachio;
- moss;
- thread or tow;
- knife;
- scissors.
Manufacturing
- Let's make an acorn from the head. To do this, we paste hair from the threads, draw the eyes and mouth, and from the twig we will make the nose.
- We will connect a head with a trunk, preliminary having made in a cone-trunk a deepening.
- From the twigs we will make arms and legs, having broken off them on the necessary length. We fix the hands and feet on the body with glue. From the halves of the pistachio shell we make our feet and attach them to our feet. We glue an article to the stand.
- We will make an ax from a match and sunflower seeds. From the pieces of birch bark we glue the wood. If birch bark at hand was not, then instead of it you can use thick paper or cardboard.
- Zadekoriruem stand with moss.
| | |
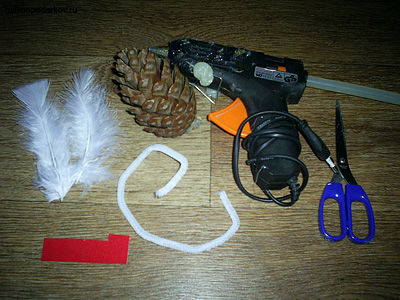
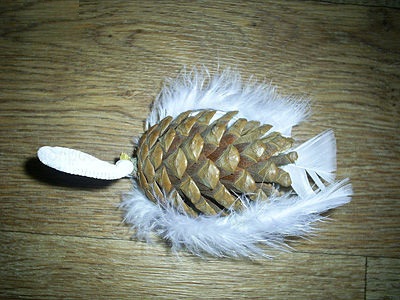
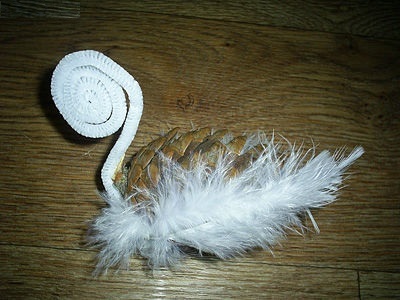
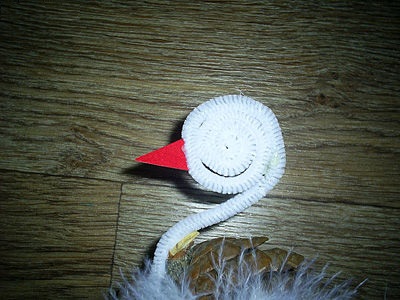
Hand-made cones "Swan"
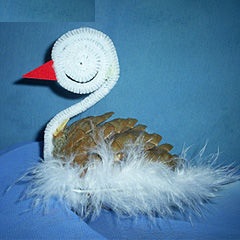
We need:
- pine cone;
- white feathers;
- fuzzy chenille wire;
- velvet paper of red color;
- scissors;
- glue.
Manufacturing
- Make our swans wings and tail. To do this, we attach large white feathers to the cone on both sides, and a small feather behind it.
- The chenille wire is curved in the form of a swan neck on one side, previously twisting in the form of a spiral on the other. Glue the neck to the bump.
- From velvet paper, we cut out the beak-triangle and stick it to the head.
| | |
| | |
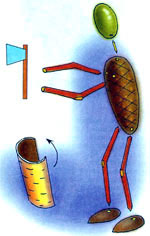
Handmade of cones "Bird"
We need:
- pine cone;
- hip;
- beads;
- wire;
- toothpicks;
- leaves are dry.
Manufacturing
- Let's make a head from a dogrose berry. For the eyes, fix with copper wire beads, stick a crest of the leaf.
- Attach the head to the lump-torso with a toothpick.
- We will make wings and tail from suitable leaves.
We make paws from toothpicks and fix the hand-crafted item on the stand.
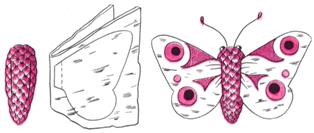
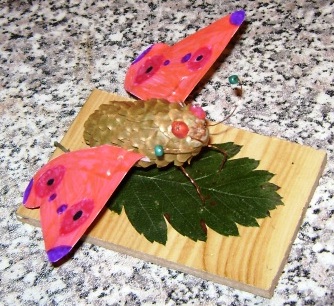
Arrangement of cones "Butterfly"
We need:
- pine cone;
- copper wire;
- beads;
- birch bark or thick paper;
- knife;
- glue;
- markers.
Manufacturing
- Cut out the birch bark or paper wings. Let's colorize using markers, applying a characteristic drawing.
- On the cone-trunk we will make cuts and fix the wings with glue.
- From the beads make the eyes and secure with wire.
- We shall bend from a wire antennae and legs, we fix on a trunk.
| | |