Probably, everyone will agree that it's not easy to do without a housekeeper. Keys in the house, as a rule, a lot - the key to the house, from the garage, from the car, and very often they are lost if the house has no special place for their storage. Of course, you can do with a couple of nails or hooks, pushed into the wall, but it will look much more aesthetic, if we use the housekeeper for this purpose. The clavicle - this is often a wooden craft with hooks, which cling keys, harmonizing its appearance with the interior of your hallway. There are various ways to decorate the housekeeper, we will decorate it with a traditional way for wooden handicrafts - we will make decoupage.
House-clerk-house with own hands
In the master class, we show an example of how to make a housekeeper in the form of a house and decorate it by mastering the technique of decoupage for beginners.
So, for work we need:
- blank for decoupage, which is made elementary from two sections of chipboard, thin doshochek and several hooks, in our case three hooks are used;
- acrylic lacquer;
- acrylic paint;
- lacquer, giving a 3D effect;
- contour for decoupage;
- PVA glue;
- map for decoupage;
- Crackle lacquer.
Decoupage of housekeepers: master class
Prepared everything you need? Then let's get to work!
1. Prepare the workpiece for the housekeeper. We will wash it, degrease it and let it dry completely.
2. Now we will be painting the workpiece with acrylic paint. We use for this purpose a usual kitchen sponge.
3. Let the workpiece dry completely, then apply another layer of acrylic paint. We paint everything except the hooks, although if they accidentally get dirty, they can easily be wiped off.
4. As a decor we use a map for decoupage on trophy-hunting subjects. Of course, it is better to use a card with a theme suitable for the interior of your hallway, but if you are new to decoupage techniques, we recommend using a special card sold in handicraft shops, if this experience already exists, you can use a regular napkin with the drawing you like.
5. Apply the decoupage napkin to the workpiece, denote its contours.
6. Now, with the help of a pencil and ruler, we will draw the lines outlined as contours.
7. Now cut out the napkin to the size of the workpiece.
8. We make a test fitting the card to the workpiece, make sure that it is cut right.
9. Then prepare a plate with warm water and well soak the card.
10. While the card is soaking, cover the workpiece with a thin layer of PVA glue.
11. Place the card on the workpiece and glue it evenly.
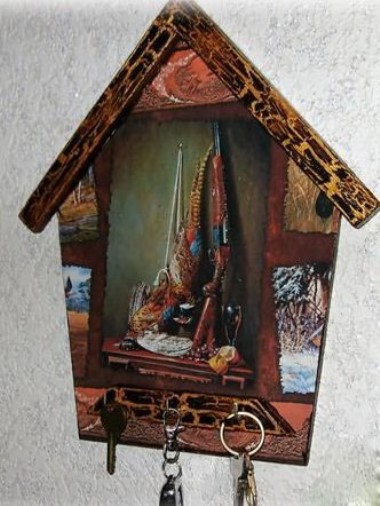
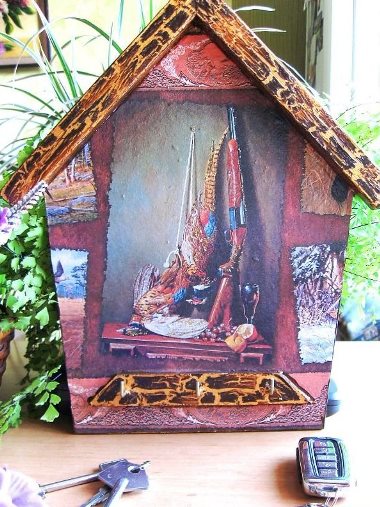
12. Now, let's define the color of the roofing of the house-workpiece. Choose an acrylic paint of golden color.
13. Now cover the roof with one coat of paint.
14. Also we will cover the bar with the hooks for keys.
15. After letting the billet dry for two hours, apply a rich layer of varnish on top of the crackel.
16. It is important to apply craquelure with the same movements in one direction. This will help us to emphasize the texture of the tree.
17. Let's give our almost finished housekeeper three hours to dry, then pick up the color of the paint, contrasting the first layer.
18. Now cover the workpiece with usual acrylic lacquer in one layer and let the time dry out.
19. Dry the workpiece with another layer of acrylic lacquer.
20. Now we finally apply a layer of paint of a dark brown color and large volume cracks begin to form on our eyes. Let's leave the roof dry, we will at this time apply a golden paint to the individual elements of the drawing of the decoupage card that we like, the brightest and most significant.
21. This is how small details, painted in gold, look.
22. Finally, we begin to work with a 3D volumetric varnish.
23. In our motif there are grapes, an orange. Let's paint them with a volumetric varnish, we will note with its help a rim of a glass and separate elements of a gun.
24. In the end, we will cover with the acrylic lacquer the cracks formed on the roof of the house-cake.
25. Finally, our housekeeper is ready. Enjoy using it!
| | |