The closer sunny summer, the higher everyone's mood rises. No wonder the song sings "summer is a small life ...". In particular, each of us expects an honestly earned vacation to go on holiday to the sea, river or lake. And to your voyage it is recommended to prepare in advance. And this, by the way, concerns not only the putting in order of his own figure. You should consider your wardrobe at the resort, especially if you want to look fashionable and modern.
In addition to a beautiful swimsuit , stylish slippers and a suitable beach bag for accessories, every self-respecting tourist should have a tunic. Tunic called the kind of actual more than one year of dress, which appeared even among the ancient Romans. In the classical form, this dress is up to the hips and lower without a brightly marked waist or with an overstated waist in the shape of the letter T.
The beach tunic is comfortable: just put it on the swimsuit and go to the beach. It always allows you to look winning, hiding the flaws and exposing your dignity at its best. Of course, the easiest way is to buy this wardrobe item in the store. But even beginners seam the tunic with their own hands. It's not so difficult, besides, you do not need to alter the pattern for yourself. So, we'll tell you how to sew a beach tunic with your own hands.
How to sew a tunic for the beach: materials and tools
In order to sew a beach tunic, prepare the following tools:
- cut fabric (knitwear, chiffon, elastane or viscose) is more preferable to transparent, but choose for your taste and discretion;
- scissors;
- centimeter;
- tape for edging;
- an elastic band;
- thread in tone;
- sewing machine.
How to sew a tunic: a master class
When all the necessary materials are available, you can start sewing:
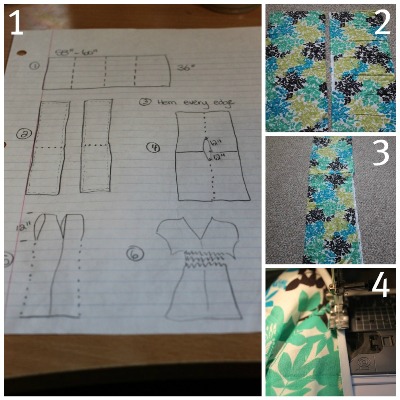
- Make the necessary measurements: measure the volume of the chest and the length from the forearm to the desired point on the arm (for example, to the elbow joint) by the centimeter. Add these two numbers and double them - this is the length of the piece of fabric. As for the width of the cut, this is the desired length of the tunic: it can be short, medium (below the hips) or reach the ankles.
- Divide the fabric along the width into four equal segments and cut with scissors.
- Each two strips must be sewn among themselves along the narrow side, thus creating two long strips. It's half of our future tunic.
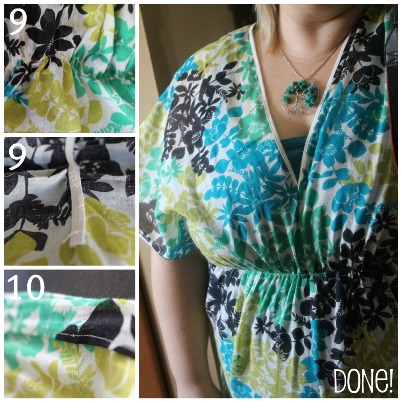
- Each of the resulting strips should be edged on the sides of the tape from the seam to 25-30 cm on each side. So we decorate the future neck and sleeves of our tunic.
- After this, attach two strips of fabric to each other.
- You can connect the parts to each other on the sewing machine: attach the parts to each other. In the edged edges in the middle is the neck. In the place where the ends of the fringing on both sides meet, it is necessary to make a machine stitch, connecting the edges of the blanks with each other.
- You got a whole canvas with a neck.
- Fold the resulting sheet in half with the front side inward and tuck the sides of the tunic from the end of the rim around the sleeves.
- Now it remains to designate a belt for our tunic, so that later it would advantageously emphasize the feminine outline of your figure. Use an elastic band 30-40 cm long. Attach it to the center of the front of the product approximately under the chest or where the ribs end. Use the machine zigzag for this.
- At the end of the work, you only have to deal with the bottom edge of the product: tuck it in at a distance of 1.5-2 cm, iron it and process it with a machine-assisted seam.
Done! Now you can do a nice thing - fitting and photo session.
As you can see, sewing a dress-tunic is not at all difficult, besides it is inexpensive and interesting.