Kumihimo called the Japanese art of weaving the cord. With these cords of silk thread Japanese women tied a kimono, and samurai - attached to it their swords. We can use this technique to make bracelets from threads , shoelaces, gift decorations, the same belt for a dress or trousers. The Kumikhimo Fenechka was often woven by the adherents of the hippy culture as an indispensable attribute on the wrist or hair. And you can weave such an ornament for your daughter. By the way, whole canvases are being taken seriously by the Kumihimo.
The technique of weaving Kumihimo is not simple and diverse. Round, flat and hollow cords can be obtained. We offer you kumihimo for beginners, we will use 16 threads, resulting in a round lace-amulet.
Weaving of Kumihimo cords: necessary materials
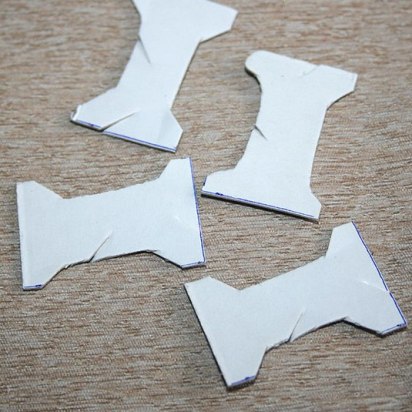
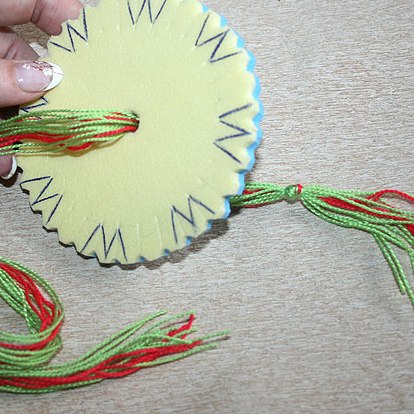
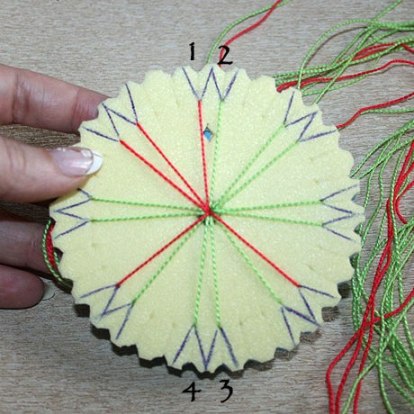
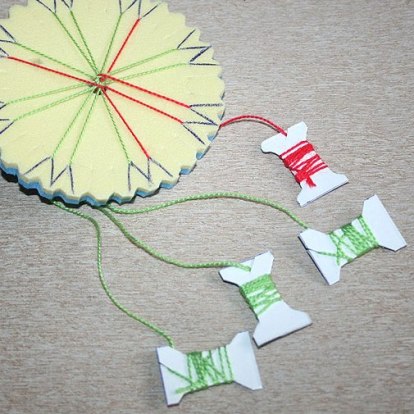
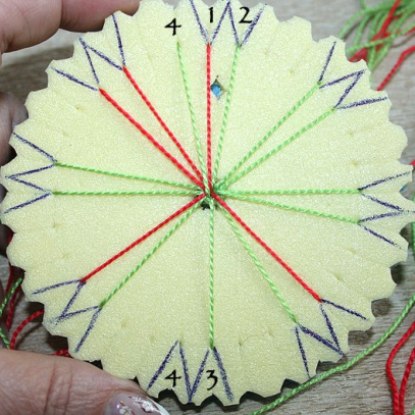
For weaving, you need a special device. The machine for the Kumihimo, Marudai, used by the Japanese in the Middle Ages, was large and wooden. Now lovers of weaving cords use small round devices with a diameter of 10 cm made of plastic or cardboard. You can easily make it yourself. Cutting a circle, make a hole in its center 1 cm in diameter, and around the edges - 32 incisions with curvatures in order that the thread is better to get there. Do not forget to also mark 16 sectors on the maruda and a rhombus marking the start. It is convenient enough when weaving Kumihimo to use cardboard coils, so that the threads do not get tangled. In addition, you will need a thread, for example, iris, two colors, we have it green and red.
| | |
Kumihimo: master class
So, let's start the weaving:
- We cut 16 threads with a length of 50 cm, of which 5 should be red, the rest - green. The required length of the thread is determined as follows: after measuring the circumference, say, the wrists, add 6 cm (this is the length of the lace) and multiply by 2 - the length of the threads to be cut is obtained.
- We pass their edges into the central hole of the machine, we tie it in a knot, and, pulling the threads in front, we begin to unfold on the notches according to the color scheme. The free ends of the threads need to be strung on the coils.
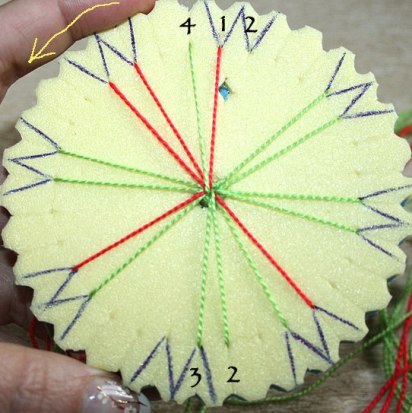
- The workers in this weave are threads 2 and 4, that is, the upper right and lower left. This means that only we change them in the process of manufacturing the Japanese lace Kumihimo.
- We move thread 4 in the notch to the left of thread 1. This thread appears as on top of the other threads.
- Now thread 2 is rearranged to the notch to the right of thread 3. As a result of these actions, the left thread lies on the left, and the right one lies on the right.
- The machine must be turned counter-clockwise so that in place of the previous sector was the sector, located to the right of the start. Now, with these threads, proceed exactly as before - that is, the left lower thread is rearranged to the top left, the upper right thread to the bottom right. Then, again, rotate the maruda counter-clockwise to the next sector and repeat the operations with the working threads. Pay attention, that at weaving it is not necessary to tighten strongly threads. Otherwise your lace will turn out to be hard and with an uneven pattern.
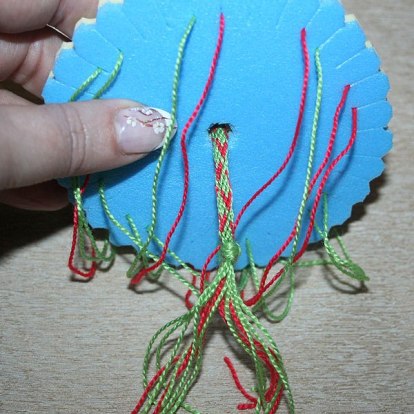
- Gradually, from the underside of the machine will be a cord with a knot and brushes at the end.
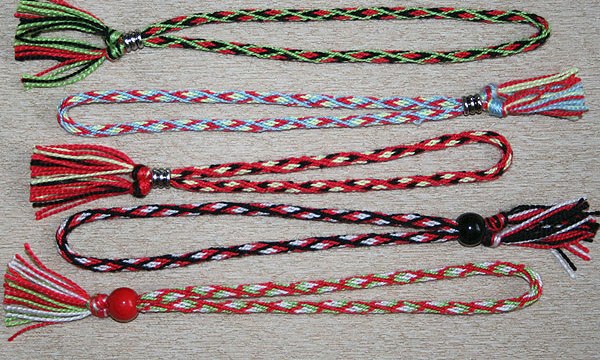
- When the ends of the threads become short, the braided lace needs to be removed from the maruda, and the ends of the threads - tied into a knot. On both sides with scissors we equate the ends of the threads to obtain identical brushes. The cord can be decorated with a bead with a large hole. To do this, in the bead first you need to stick a loop of a thin thread. Then we insert a cord into this loop and pass it through the bead. Done!
| | | |
We hope our master class "How to Weave Kumihimo" will inspire you to create your own cords!