In the quilling technique, you can make a large number of different animals, birds, shapes and objects (for example, chamomile , butterfly , flowers or Easter eggs ). If you have some free time, then you can try making a peacock twisted paper. This work is fascinating and interesting.
Peacock in the technique of quilling: master class
Before you make a peacock qwilling, you need to prepare the following materials:
- blue two-sided paper (2 sheets);
- yellow paper (2 sheets);
- green paper (2 sheets);
- purple paper (1 sheet);
- dark green ribbons measuring 0.5 to 20 cm;
- black tape measuring 0.5 to 20 cm;
- scissors;
- wooden stick;
- file;
- PVA glue;
- pins.
Quilling the peacock - the manufacturing scheme is as follows:
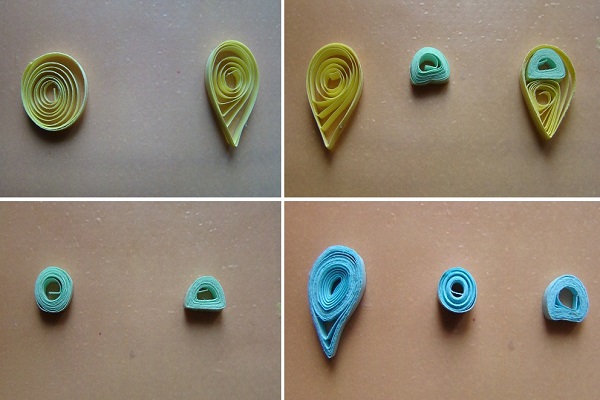
- We take the blue paper and cut it with ribbons 5 mm wide. To make a head or a wing of a peacock, it is necessary to glue two ribbons behind the edges, and then twist them with a stick.
- Give the ribbon a little untwist and glue the edge of the tape to the main strip.
- We squeeze the resulting spiral on one side to make it look like a drop of rain. In order for us to get the peacock to be a quilling technique, see what kind of curls should be used to create it.
- We put the details on the file.
- To make the torso of a peacock you need to twist droplets from blue strips.
- All parts of the body are glued together.
- For the wing we make curls of green paper. On the one hand, the circles must be pressed to make a crescent. Between the wings of a peacock of blue color we glue the green ones.
- We take two more strips of green color, we twist into circles, we make a crescent. We glue in the lower part of the trunk. From this place will begin the tail.
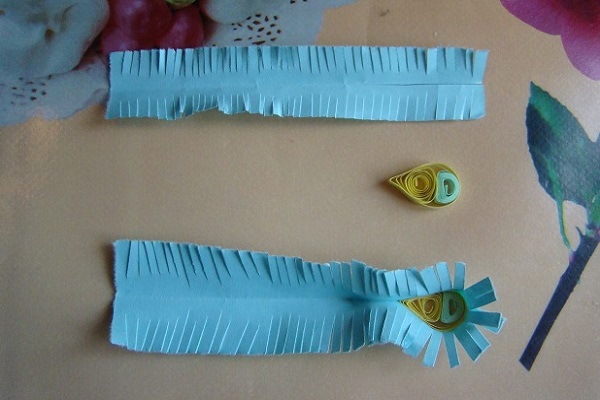
- Let's start creating feathers. The blue ribbon is folded in half and we make cuts on each side a short distance from each other. The middle of the strip should remain intact.
- Straighten the ribbon. On the one hand we make an incision of 3 cm (this is the base of the pen).
- The yellow leaf is cut into strips 20 cm long. We twist the spiral, press it from one side to the formation of a crescent.
- Similarly, make a crescent of a green strip.
- Inside the notch with a fringe on the sides we glue two crescents - blue and green. The pen is ready.
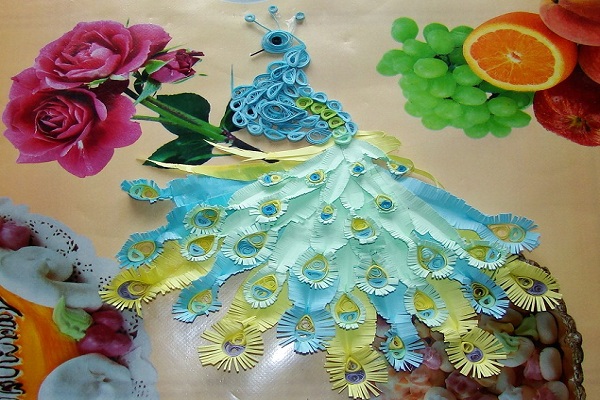
- in the same way do seven small feathers of green color, 25 large feathers of green color, 8 large yellow and 8 large blue ones.
- In green feathers the middle consists of a blue crescent and a yellow droplet, the middle of a blue feather is made of a green crescent and a large yellow drop, the center of a yellow feather is from a purple crescent and a large yellow drop.
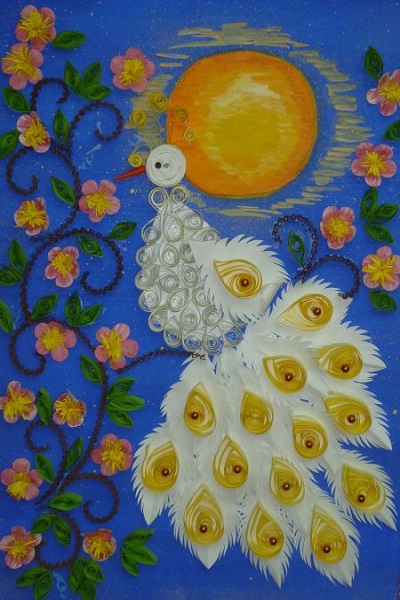
- From the feathers begin to collect the tail, as shown in the photo below: first glue the big green feathers, on them - small green ones. Under the glue we glue the big blue feathers, under the blue - the yellow feathers.
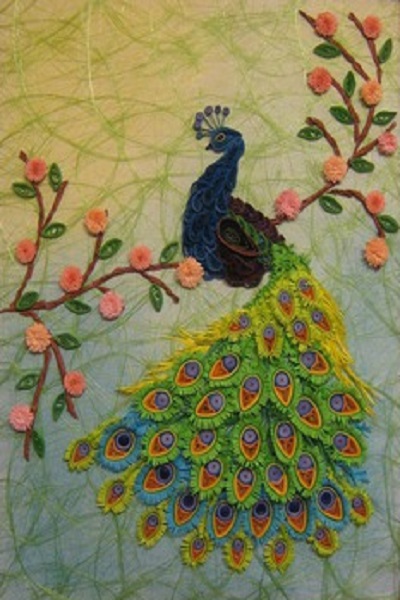
- From a black ribbon, cut a piece 1 cm long. This will be a beak.
- From the remaining piece of the strip we twist the curl. It's an eye. We glue it.
- From the blue ribbon we make three little curls. We paste on the head. This is a chub.
- After the glue has dried, we peel the peacock from the file. The handicraft is ready. Such a peacock can simply be hung on a wall or glued to a piece of solid colored cardboard.
- Varying the colors of strips of colored paper, you can make peacocks of different colors.
| | |
Make a peacock with your own hands is easy enough. Therefore, even a preschool child will be able to create such an article.